COMMAND OFFICE


|
As my 11 year old self watched the premiere of Space: 1999 in the fall of 1975 in wonder and amazement, little did I realize I would become a lifelong fan from that moment forward. As the episodes played out over the course of that first season, it wasn't just the fantastical stories that drew me into the show; it was also the look and feel of that universe. The alien worlds, the music, the spaceships (oh, those spaceships!) and the amazing Moonbase design itself. All these years later, I now have the books, comics, soundtracks, Eagle models, and all manner of paraphernalia and collectibles from all around the world - thanks to the shows international distribution and promotion in the US, UK, Germany, Italy, Japan, Portugal, Turkey, Philippines, Hungary, etc. Over the years, I always felt my room with all of these items should somehow also reflect the show itself as well. But I wasn't really sure how I could accomplish such a thing, so the idea stayed in the back of my mind for years on end, always there, always resurfacing whenever I focused my time on some facet or other of the show. And then I stumbled upon Catherine Bujold's Sorellarium... Here was someone that had created the look and feel - not only the structure, but had also incorporated the furnishings; including the amazing Sorella lamp. But beyond all the great photos of the installation, Catherine also included a handy DIY instruction set, depicting the blueprint for the standard 4' x 8' dimensioned panel along with the measures of all the interior panel cutouts. My tipping point had been reached, I now had a real plan of attack to move forward. I had known the actual set wall panels were fixed-size modular pieces to allow for easy reconfiguration by the set designers, but I had never known the dimensions. I quickly measured my home office and saw it could easily accommodate a number of these panels side-by-side. But then there was the height of the room. My office has relatively high ceilings at 10' and there would be large gaps above a standard panel. I spent hours looking through images in the Catacombs at all the various rooms in Alpha for a solution. All the Alpha hallways and crew quarters are 8' single-panel height. And many of the specialty rooms, like Nuclear Generating Area or Main Mission, are enormous caverns, 20' or so in height. But eventually I spotted the middle ground - Koenig's Command Office with the sunken pit area used for command conferences. All the walls around the pit are 10' in height - standard 8' panels topped with 2' extensions. I had an in-show solution. I then printed out all the various sized panels onto paper and began rearranging them into multiple different configurations for visualization. 1. Boring, ugly office room demanding improvements. 2. Paper miniature construct to visualize the project. 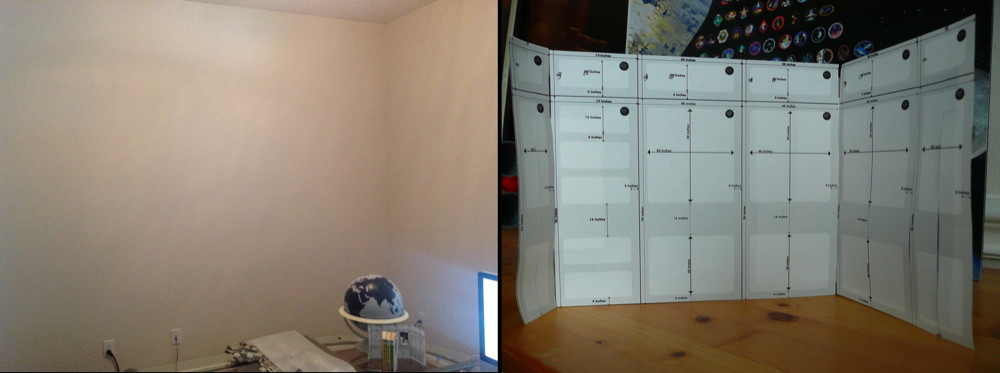
So now I knew the grand plan of the design, but didn't know how I would actually build it. Catherine Bujold used 1/2" thick MDF panels placed up against the walls or floating a couple inches away. Being flush wouldn't work in my space, as there is 1" thick baseboard trim that I didn't want to rip out - and therefore the panels couldn't be flush to the wall at floor level. As well, there were outlets for power, cable and phone along the wall that needed to be accessed and not covered over by paneling. And fundamentally, I wanted the look of the 2" deep panel recess as seen in the show, which a floating 1/2" thick panel could not provide. I quickly eliminated using even 1 1/2" thick MDF, as it was far too expensive and incredibly heavy as well (200 lbs!), and still wouldn't have the depth I desired. Further web searching brought me to ��������������������������������������������������������������Stefano's Studio 1999 and to David Sisson's 1999 styled wall. Both have impressive, inspired designs and executions. Both show unique solutions for construction and installation of their particular visions. While neither was the design I was shooting for they gave me more to think on and David's did show me that the only way to have the true, deep panel recess like I wanted would be if I built it myself. At this point I spent several more months pondering how to actually construct the wall paneling. Should I build it all myself? What materials and tools should I use? How strong do the panels need to be and how do they interconnect? How will I access the wall outlets? How much would the various components cost? Should I have any panels with back lighting, and how would I install and control it all? Lots of questions with many solutions. While I continued pondering the logistics of constructing panels, I diverted my attention by acquiring some of the required room decorations - vintage Sorella lamps and an Earth globe. One strikingly memorable element of Koenig's Command Office was its large grey-on-grey globe of the Earth and it was something I absolutely had to have. A sphere as large as the one in the show was impractical, so I decided on a miniature - a standard sized globe. I thought buying a globe for the basis of this project would be easy, but it wasn't. The Command Office globe has a pole axis that's vertical, whereas nearly all globes are built on a stand with an axial tilt of 23 degrees and would require modifications. Eventually I found an old National Geographic globe from the early 1960's with a unique stand that met my specs. Two small jars of paint and a set of brushes and I was on my way. I did have to buy my first pair of reading glasses though, in order to paint the crazier coastline and island details with a size 0 brush! I now have a new appreciation of northern Canada and Indonesia. And for anyone wondering, no, I did not grey-out entire countries as was done on the show. 3. The beautiful Sorella lamp. 4. Nat. Geo. Globe 5. Globe painted in grey & black, with a beige stand 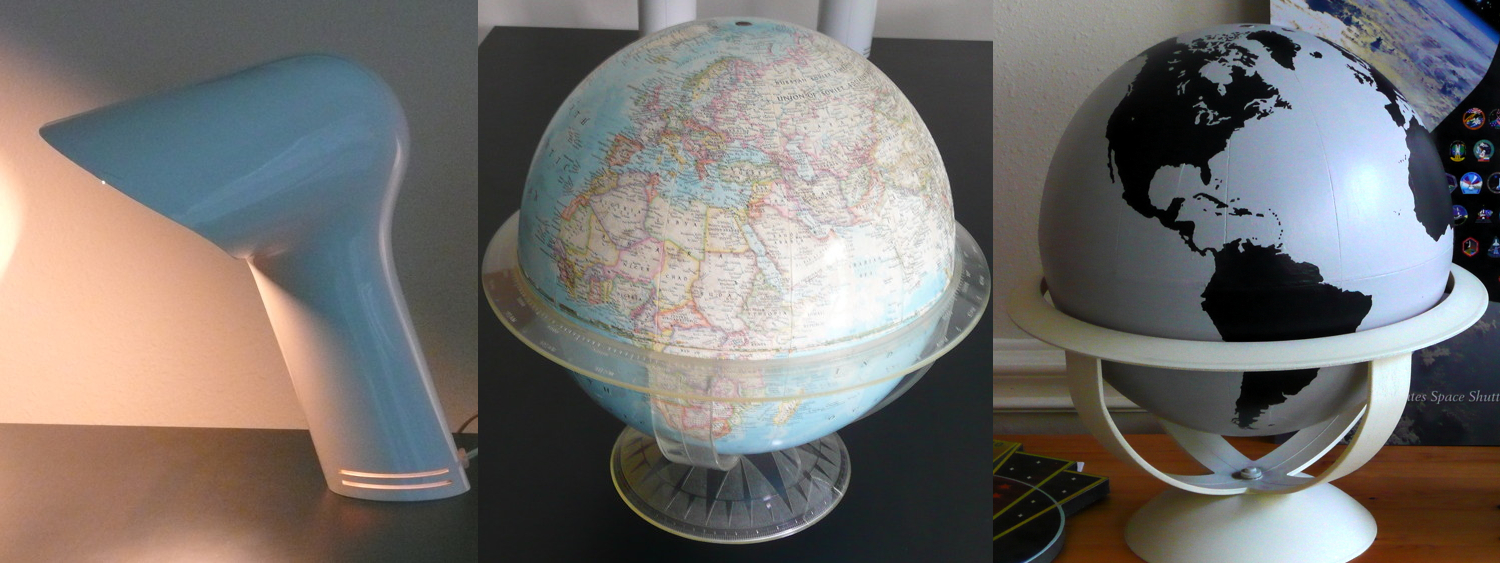
After many months, I was now ready to tackle the panels. As with the real sets, I was going to construct free-standing wall units. These would be 2" away from the wall, allowing room for the recessed sections and providing hollow spaces for access to the outlets. The upper extensions would use posts and slots to hold them in place. The units would be self-bracing, providing their own rigidity without need for anchors. It was time to hit the hardware store. I had determined how many panels to create. From there I worked out how much and what types of lumber I needed - starting with the primary ingredient of ten 4' x 8' 1/8" hardboard panels. As well as what power tools I would need - jigsaw, circular saw and drill. Using the panel blueprint from Catherine's site, I drew the cutout lines onto the hardboard. I built a simple 4' x 8' wood working station out of 2" x 4" boards and used that as a platform for all the drilling and cutting. A 4" hole-saw was used to punch out the corners of the recessed areas first, and then the jigsaw was used to cut from corner to corner to create the cutout for the recess. 6. Lumber, Assemble!. 7. Drilling out the 4" holes for the corners of the recessed areas of one panel. 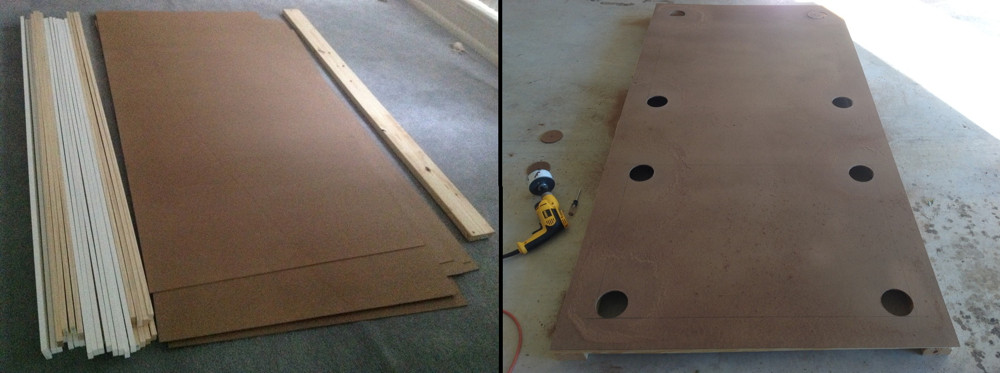
1/8" thick hardboard panels are incredibly flimsy however, so these panels needed bracing. 1" x 3" boards were glued wide-side down to the long edges of each panel, providing rigidity when vertical. 1" x 3" boards were also cut up to provide the sides of the recessed areas. The 4" hole-saw was also used to cut holes in a 1" x 4" board, which was then diced up into pieces to create the curved recessed corners. More hardboard was cut up to create the backs of the recessed areas and efficient use of earlier scraps helped significantly in supplying material. 8. Jigsaw cuts to complete the holes for the recessed areas. 9. Gluing bracing boards and frames on the back. 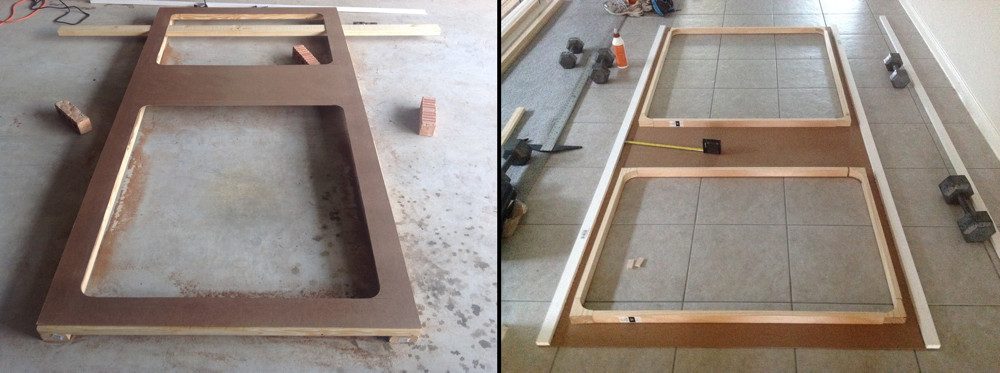
Now things were coming together. After the frames were glued onto the backs of the panels, it was time to start painting. One coat of primer and two coats of eggshell finish Swan White paint. While the panels in the show are a very light beige, I had always thought they were actually white and find that color a better fit for the décor anyway. Painting of the frames and back panels was done separately, and then keeping with the idea of easy assembly/disassembly, they were simply screwed onto the backs of the frames. 10. Test fit of unpainted, unframed panels. 11. Another coat of white. 12. Test fit of painted, framed panels. 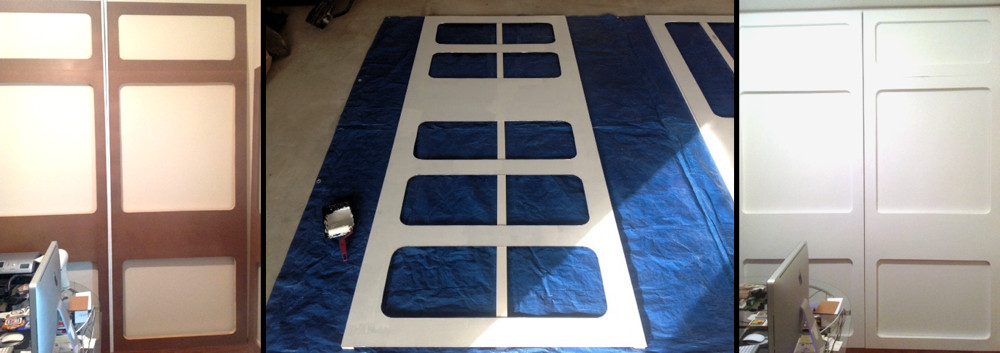
I decided to install two of the panels with backlighting. At least half of the panels in the show were backlit Plexiglass, and I felt this was a necessary feature to recreate the look. I purchased four custom cut 1/8" thick, translucent white #2447 acrylic sheets to fill in the frames behind the holes cut in the panels. With the added weight of the plexiglass, additional support was needed and both upper to lower frame-to-frame bracing as well as underframe supports were added. Nylon glides were added at the bases of all the panel, one in each support strut, inserted towards the front of the panel. The placement near the front ensured the center of gravity of the panels was behind the feet and prevented the panels from falling forward due to a weight imbalance. The addition of the feet also had the benefit of creating a gap at the base of the panels just large enough for power cords to fit through. Low profile plugs were required to fit the snug spacing behind the panels. 13. Screw attached backing board. 14. Plexiglass sheet installed in frame. 15. Nylon glides for feet. 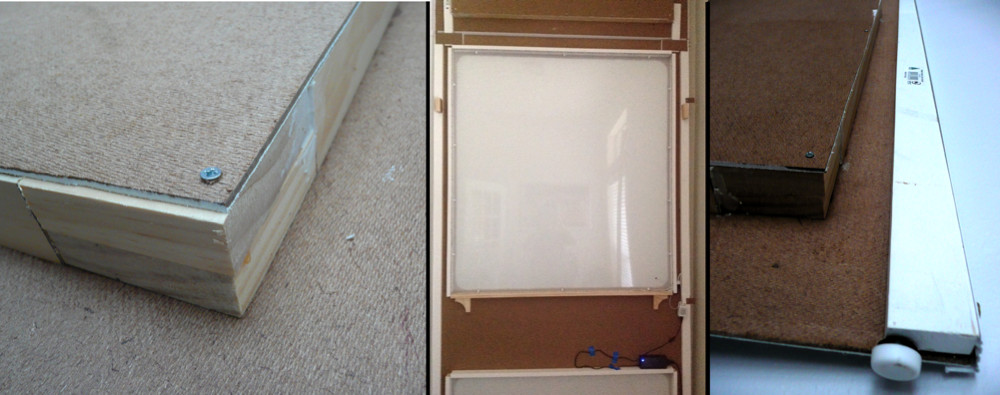
Lighting had a fairly simple solution - LED strips. Inexpensive, multi-color and easily controlled via infra-red remote (which can transmit through acrylic). Multi-color was a great benefit, as quite often in the show some of the panels were lit in blue, green, red or yellow and not always in the nominal white and that could be easily recreated. LEDs are low heat, which was also a winning factor when trying to light small enclosed spaces. 16. LED Package. 17. Testing the blue, red, green and white of a single LED strip behind one acrylic sheet. 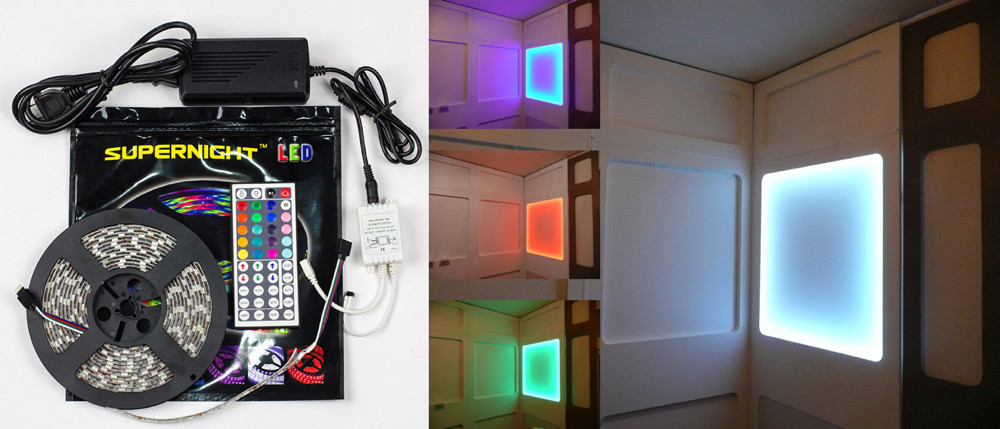
The attachment of the upper panels had an easy solution as well. Slots were created at the tops of each of the full size panels and posts were glued at the base of the upper quarter panels. Once a panel was vertical it could be rocked forward, the upper panel slotted into place and then the entire 10' panel pushed vertical again. Panel to panel connection was accomplished through little tabs screwed onto the support posts and sticking out to the sides of each panel. The tabs extend behind the adjoining panel, and when interlocked, keep the faces of the panels aligned to each other. Small blocks were added to the backs of the panels to keep them the desired distance away from the wall. 18. Upper panel post. 19. Upper and lower slotted together. 20. Wall standoff blocks 21. Interconnection tabs. 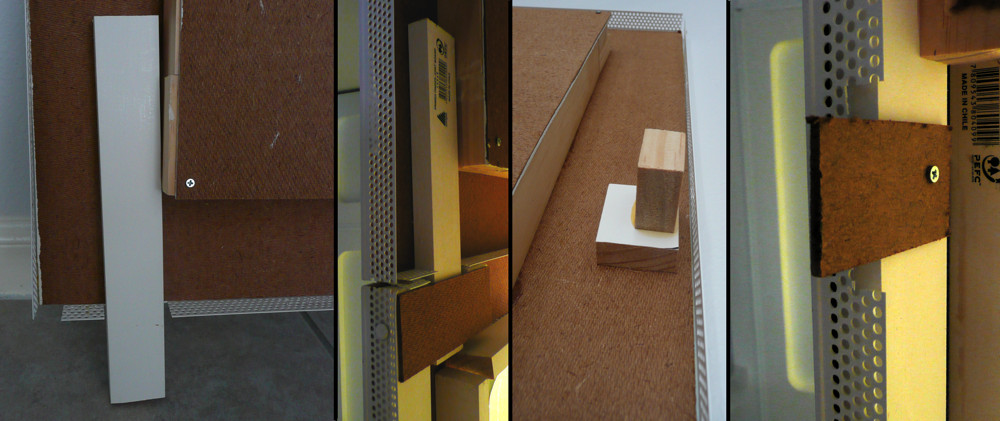
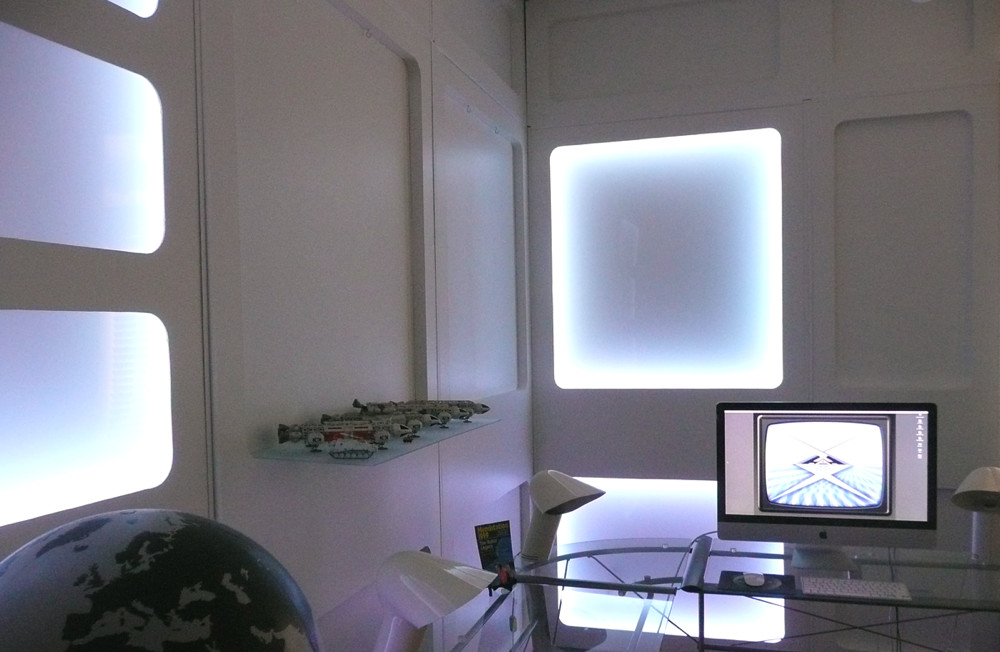
With construction, painting, and assembly complete, plastic stripping was added around all the borders. A floating bookshelf was attached to the center panel, and works as a hidden platform for a fleet of Eagles. As an added touch, the ceiling lamp for the room was replaced with one that looked like it came from Piri. All in all, my small recreation of the Alpha Command Office came together extremely well. 22. Command Office set. 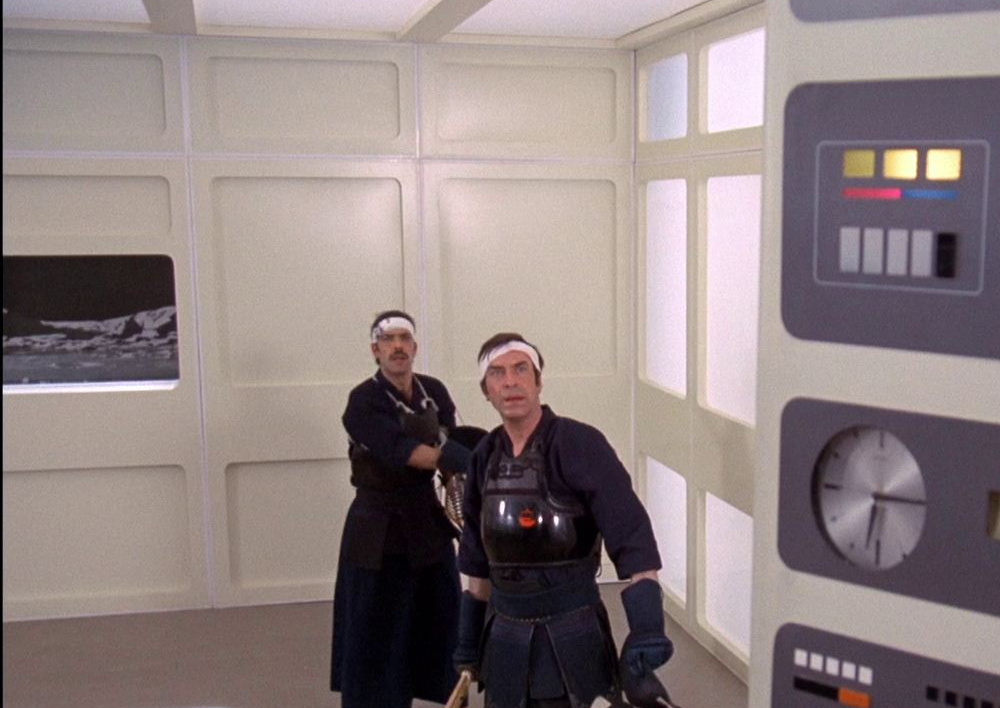
23. My Office. No windows to overlook the Moon. Yet... 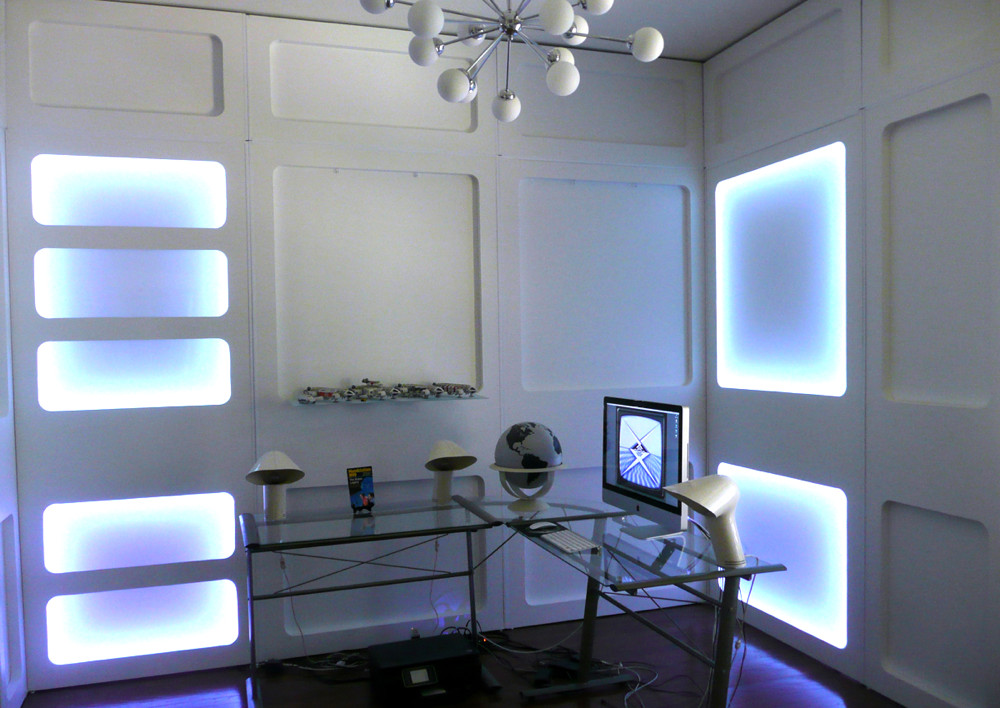
50th Anniversary Update. 24. Map as in Dragon's Domain. 25. Detail of my clear cling. 
There was one additional touch that I had thought about adding back when I had first built the Command Office - and that was to have the Year 1 Alpha Wall Map recreated on the large lighted panel. As we approach the 50th year anniversary of the show, it was finally time to tackle creating it. Over the years, high definition images of the Year 2 map and keywords had become available, so it was just a 'simple' matter of recreating it in a graphics program. (note: this wasn't simple at all!) Once I had the 40" by 44" image of the Moonbase and the text panel drafted, I had it printed in black onto a giant clear cling transparency. The next step was to create the patterned color overlays. While the Wall map barely appeared in Year 1, it does show up rather nicely in Dragon�s Domain. Screen snaps from that episode were enough to work out the overlay patterns and colors. Color gels were cut into various sizes and shapes. The toughest part was to disassemble the wall and extract the acrylic sheet. Once out, the cling was rolled out onto the acrylic, slipping the gels into place at the appropriate spots, sandwiching them in between the two elements. Once complete, the wall panel was reassembled and slid back into place, creating an amazing show piece in celebration of the show. 26. Command Office with full scale Alpha Wall Map 
|

BACK
Write
All text © Patrick Zimmerman 2025
Any use is prohibited except by permission